- Get Started
- Video Tutorials
- Knowledge Base
- FAQs & Troubleshooting
How to Enable Inventory Sync (Inventory Linkage)?
Updated on 04 Mar,2024Copy Link
Turning on inventory sync in 4Seller can support real-time updates of actual warehouse inventory to various online stores, support the synchronization of inventory from self-owned warehouses, FBA warehouses and third-party warehouses to stores, and support stores to configure inventory linkage at the warehouse level to effectively avoid overselling.
Note:
To enable the inventory synchronization function in 4Seller, you need to first complete the steps of creating Products, matching the MSKU of the product with the product SKU, and adding the inventory SKU to ensure that the set inventory synchronization rules can take effect and enable the inventory synchronization function successfully.Step 1 Create and Map Products
(1) Turn on Created automatically and Auto-Association Settings
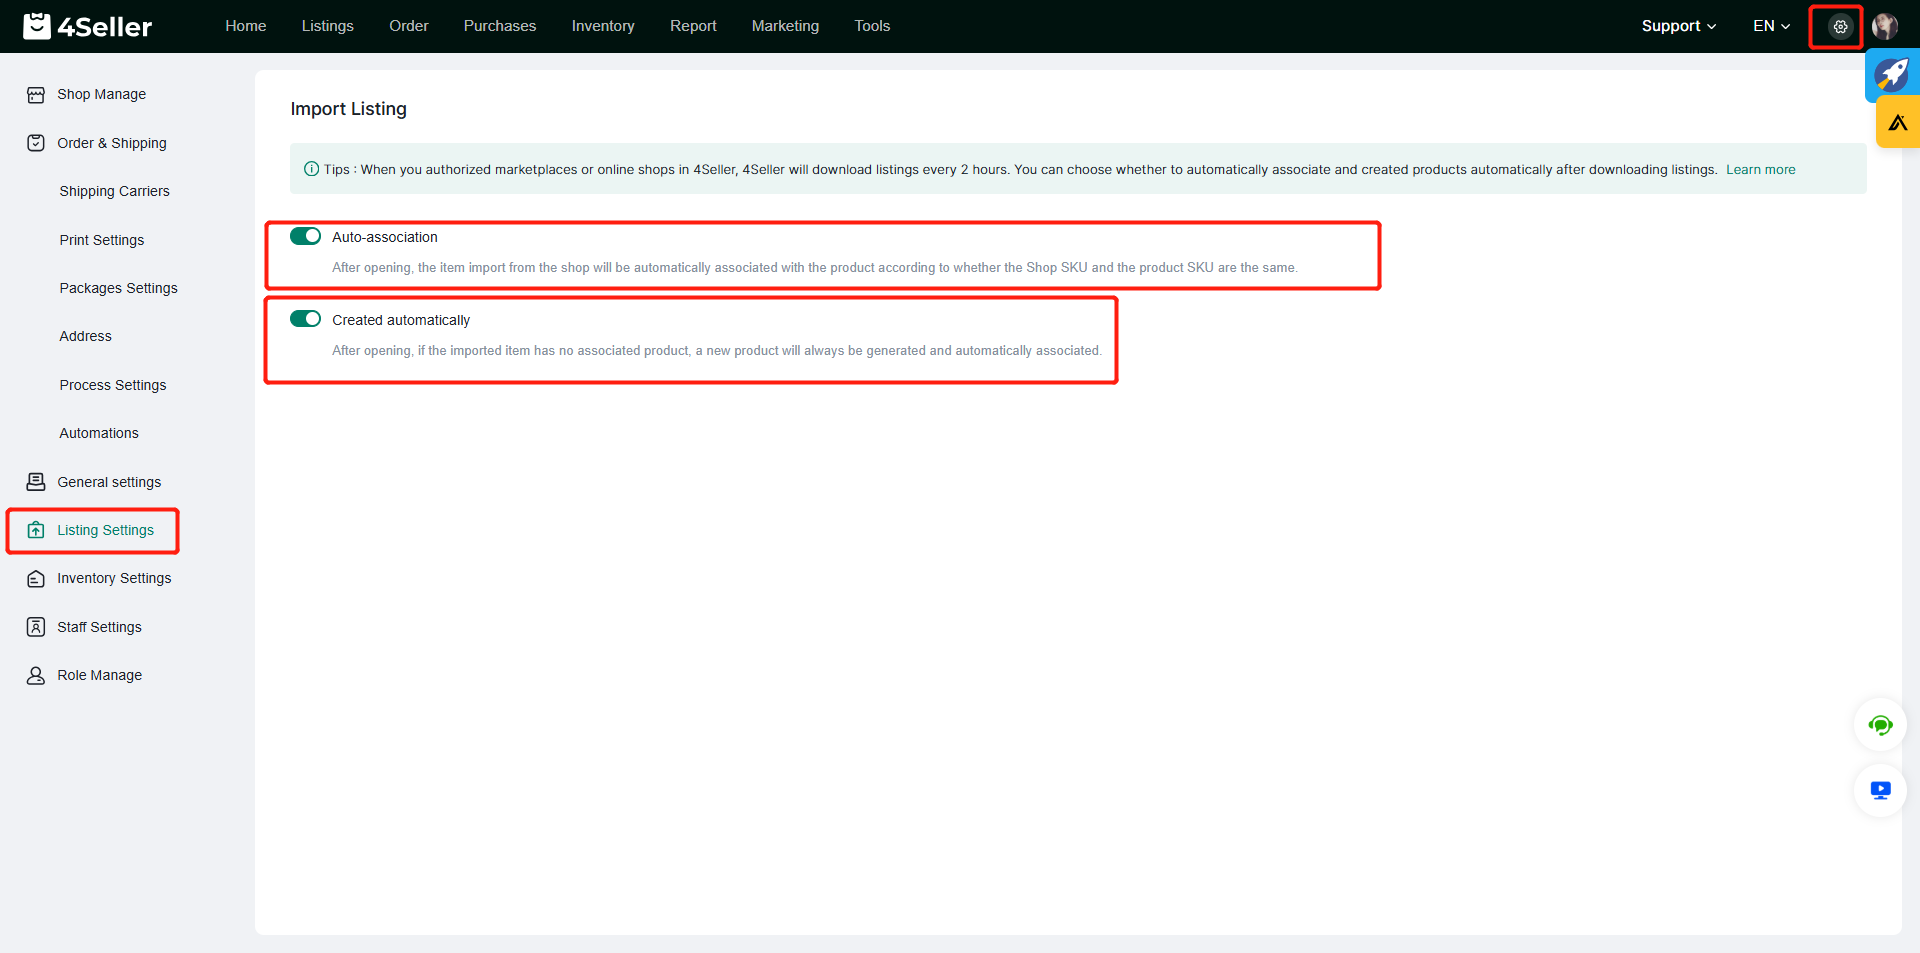
After entering the Listing Settings page and turning on Auto-association and Created automatically, the listings synchronized to 4Seller will automatically be associated with products or create new products to associate with listings.
(2) Manually Create and Associate Products
Click Inventory to enter the page of Active Products. Click Create on the page to manually create a product.
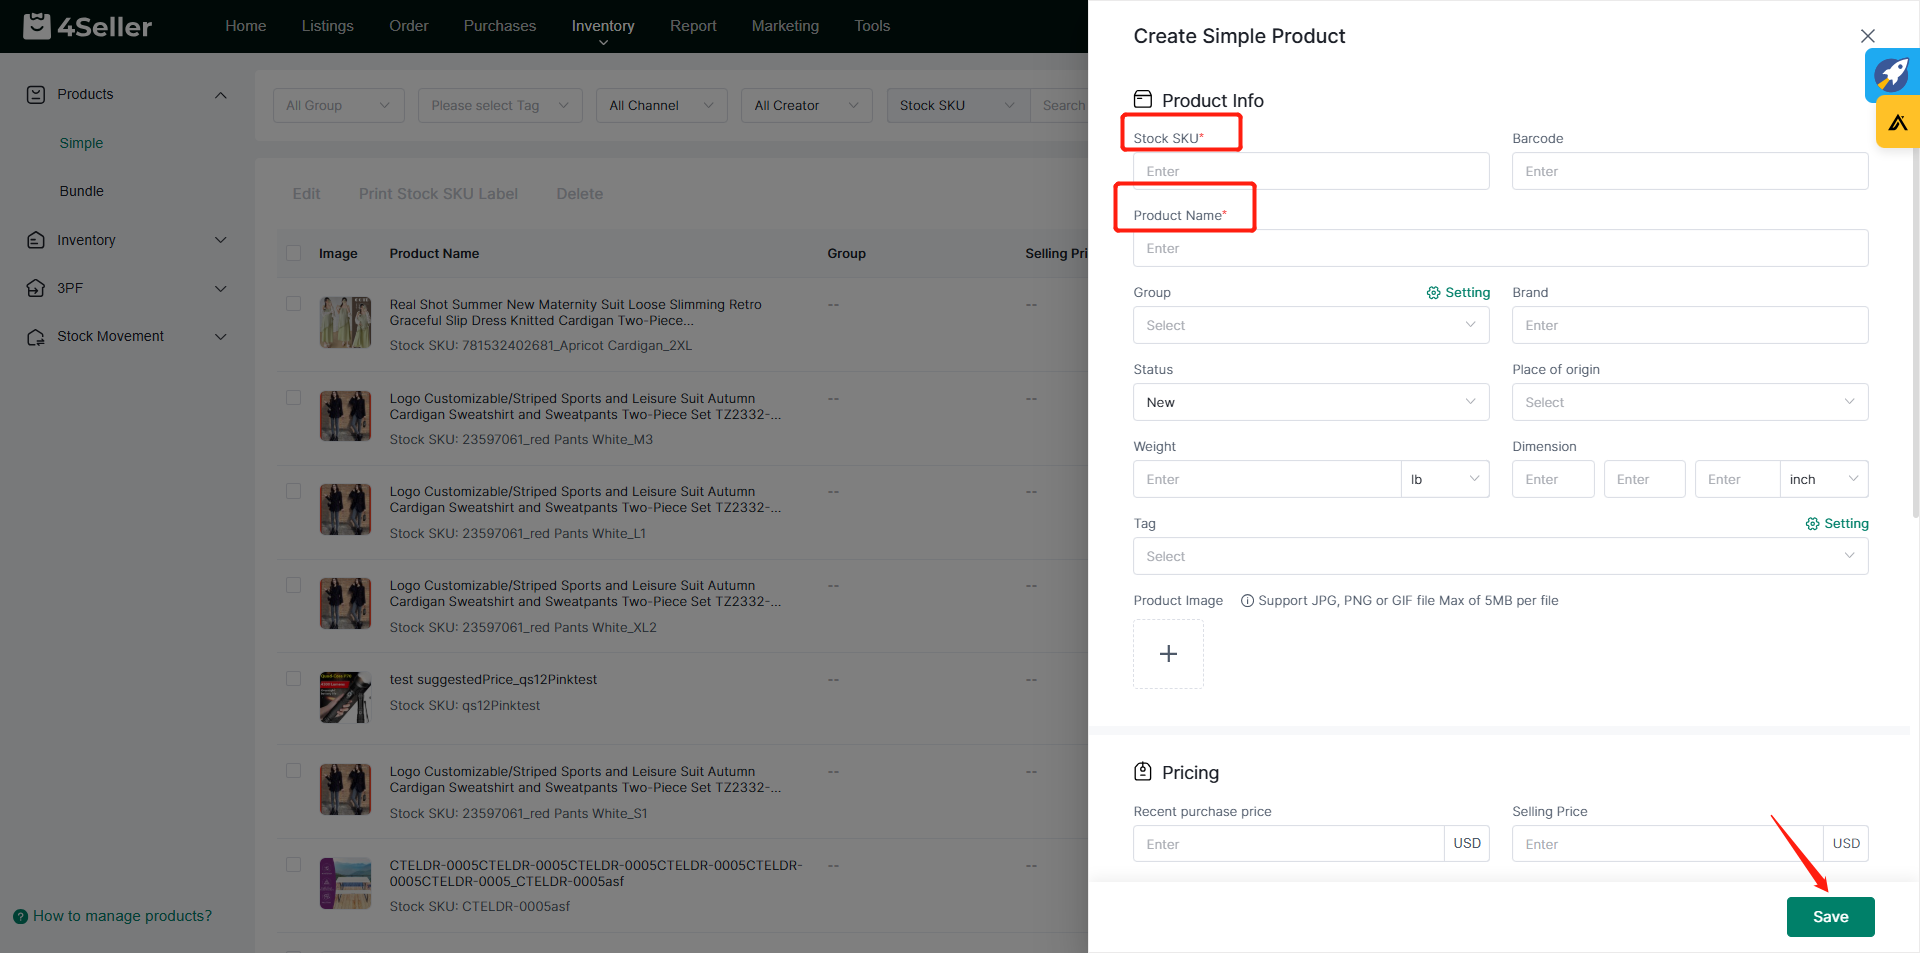
On the Create Simple Product page, you need to fill in the Stock Sku, Products Name of the product. Make sure that the filled-in Stock sku is consistent with the MSKU of the product, and the Stock sku and MSKU of the product can be associated automatically.
Step 2 Add Proprietary Warehouse Inventory
Note: This step is required when using Proprietary Warehouse, otherwise this step can be ignored.
Click to enter the Inventory page. You can click the Add Inventory button to add inventory manually, or click the Import Initialize button to import inventory in batches.

(1) Manually Add inventory
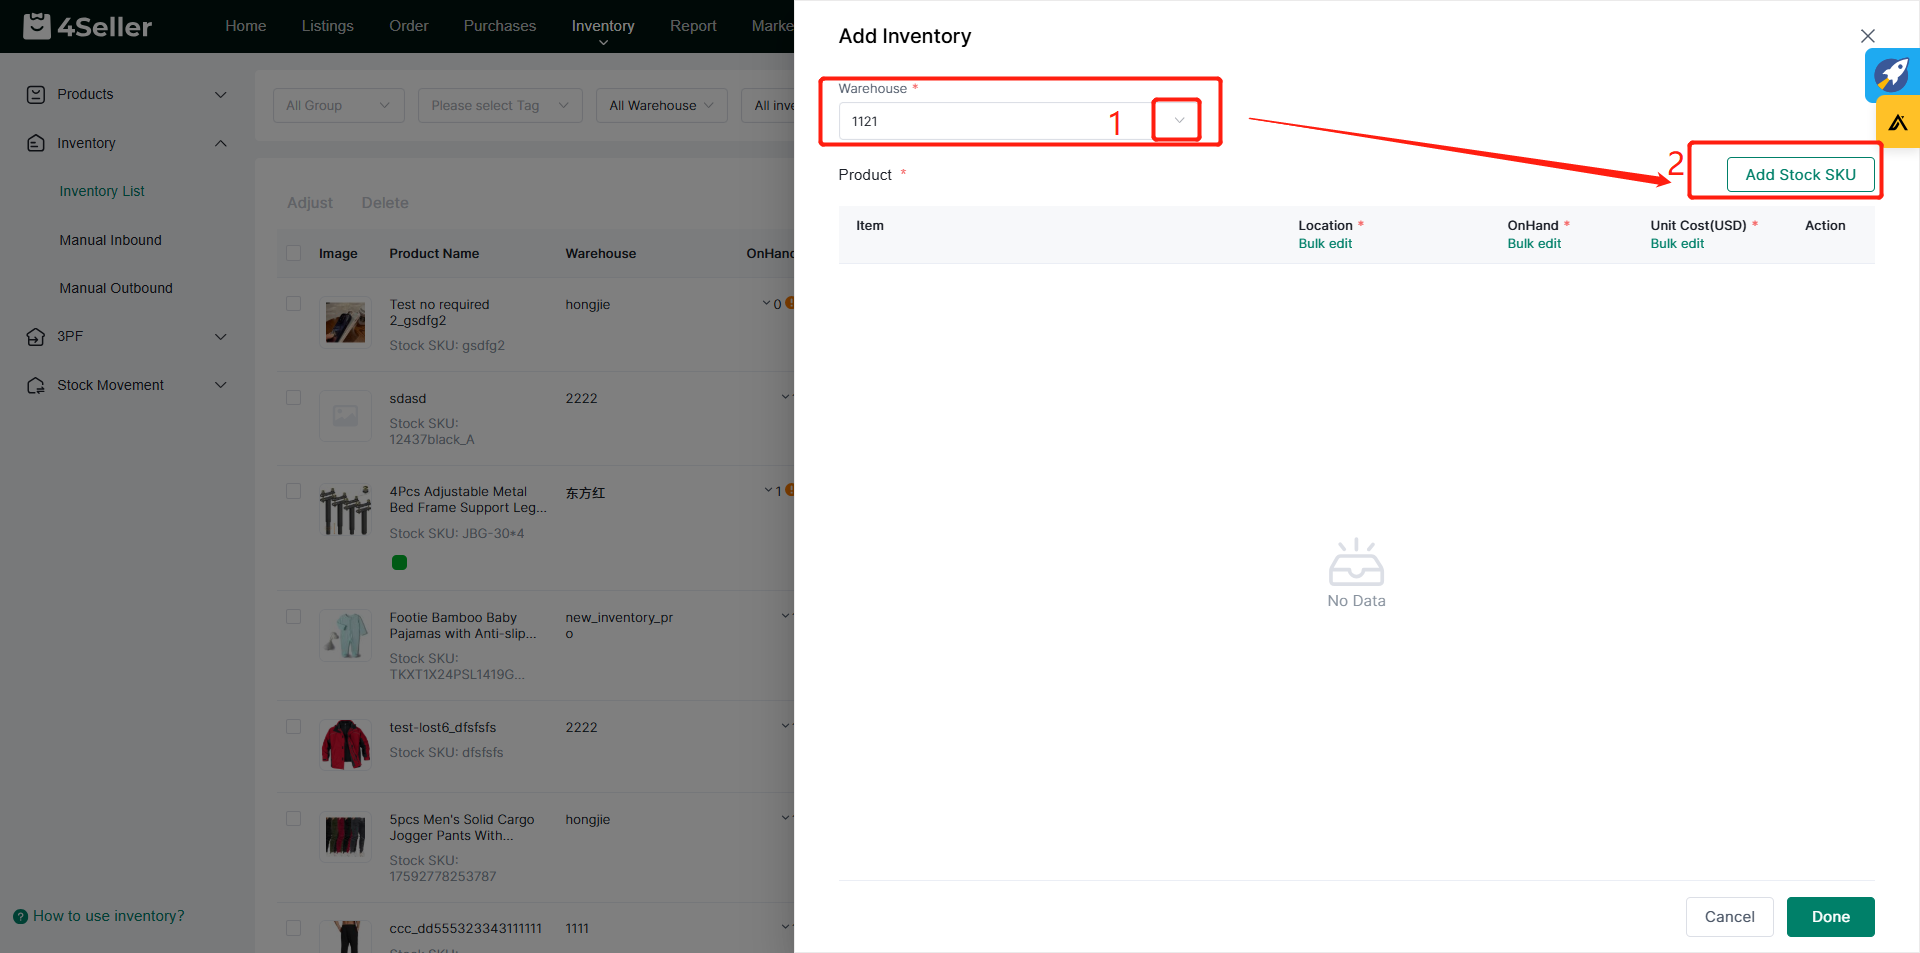
Click to enter the Add Inventory page, you can select the warehouse where the inventory is located, and click Add Stock sku to add the inventory SKU.
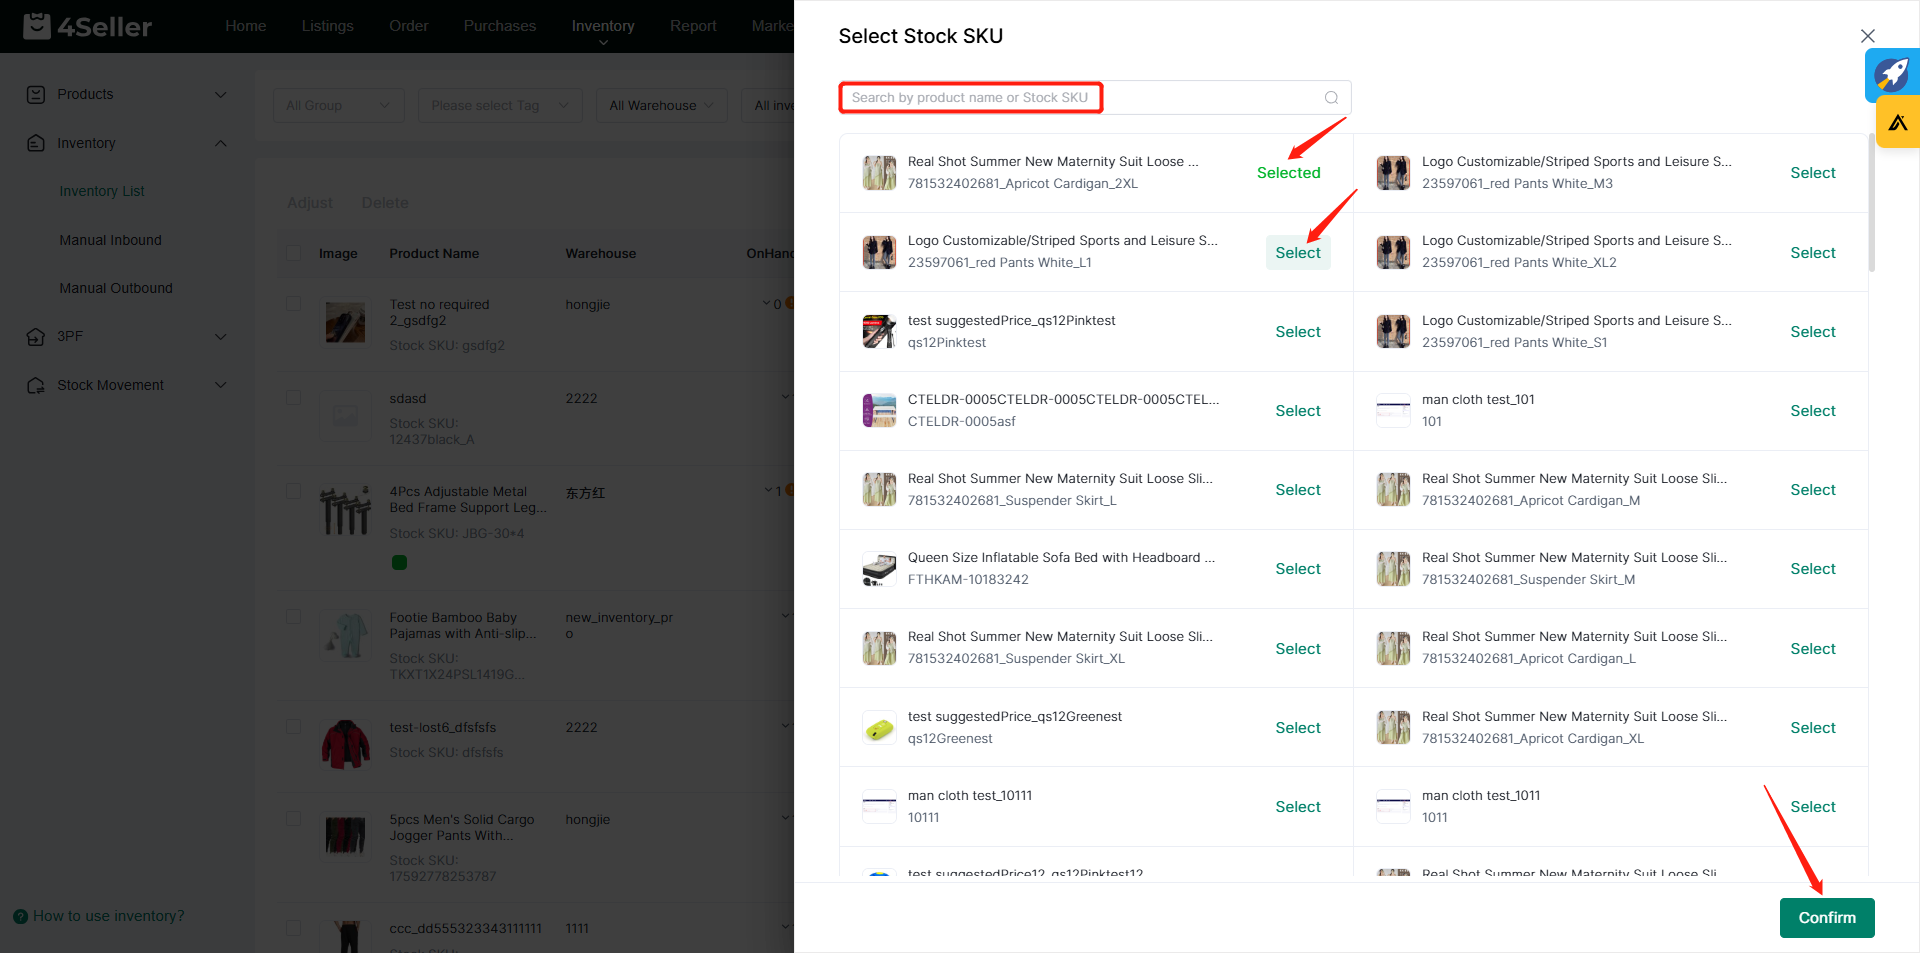
On the Select SKU page, you can search based on product name or SKU. You can click the SKU displayed as Select to add it as inventory. After the SKU is selected, it will be displayed as selected. Finally, click Save to add the inventory SKU.
The added inventory SKU will be displayed in the product information. On this page, you can select the Location, enter the Onhand quantity and Unit Cost of the SKU, and finally click Save to successfully add inventory. If you select many skus to add inventory, you also can bulk edit and save in one time!
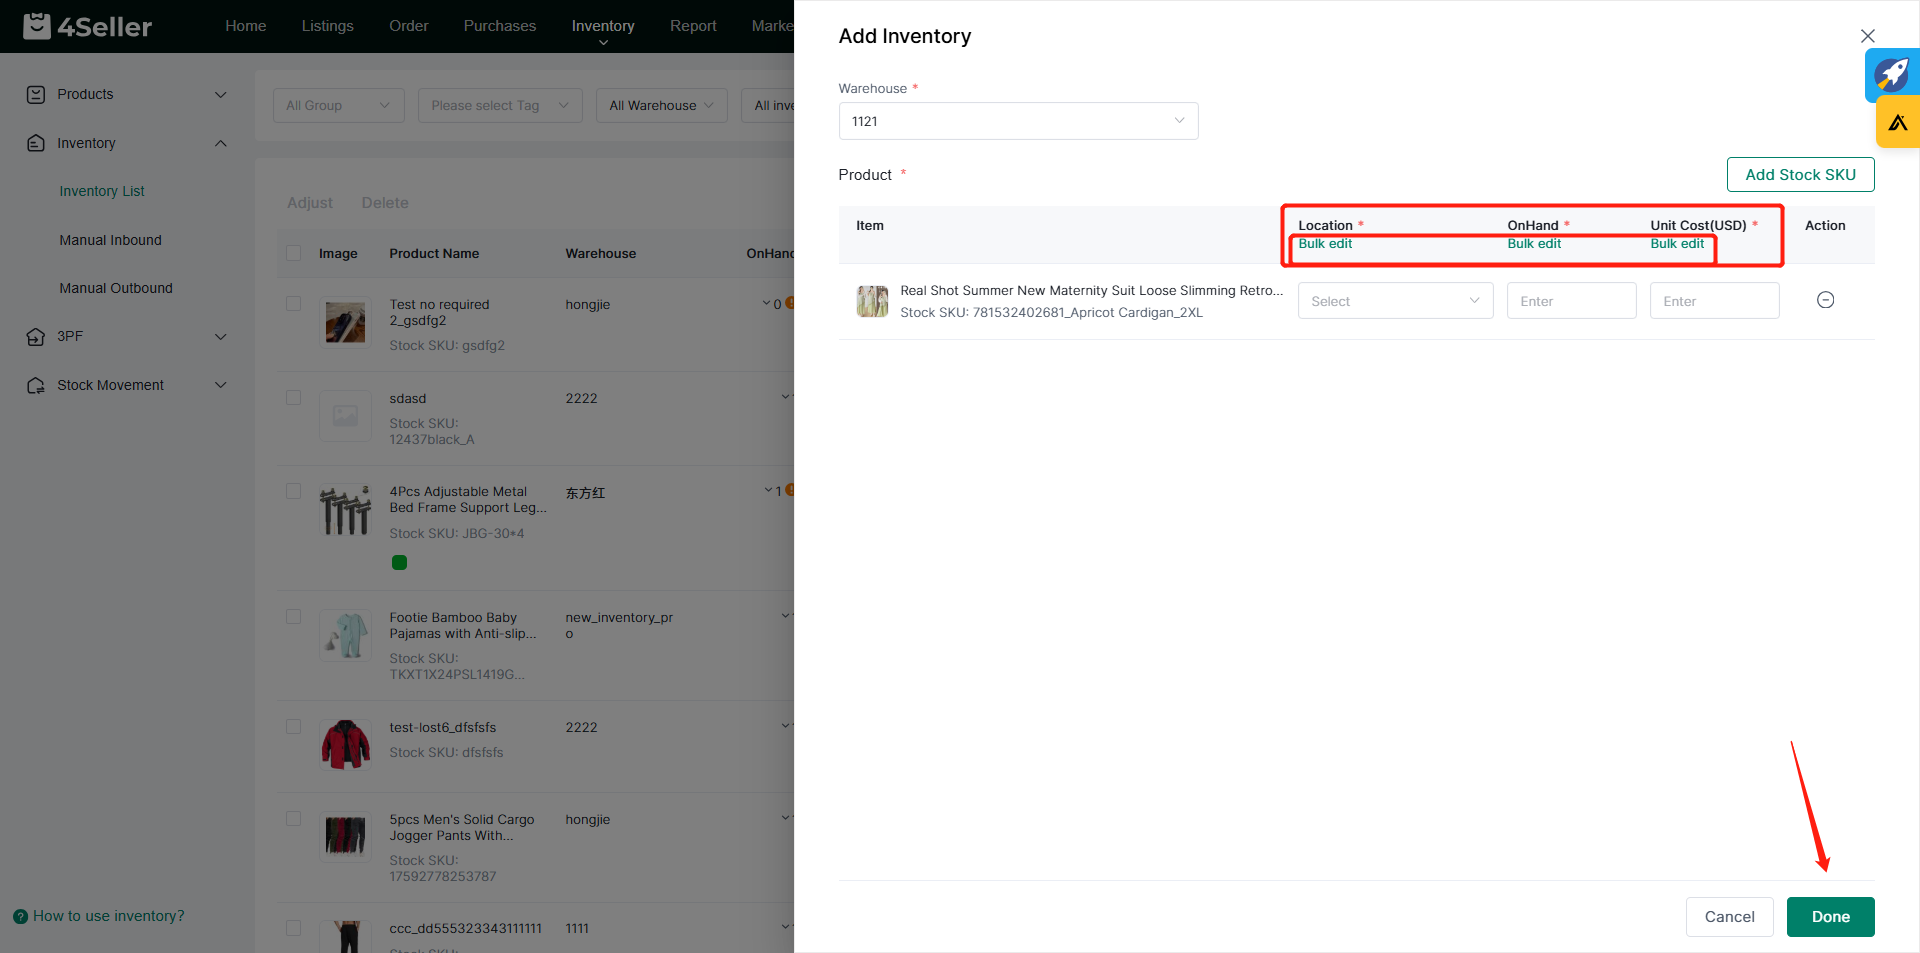
(2) Import Inventory in Batches
Clicking Import Initialize will pop up the operation box for importing inventory. You need to download the CSV template file for importing inventory first. Upload the template with the inventory information filled in and click Import to import inventory in batches.

Step 3 Synchronize and Associate FBA Inventory
Note: If you use FBA warehouse, you can refer to this step, otherwise you can ignore it.
3.1 Create 3PF Warehouse
Enter the Inventory Settings page, find the 3PF warehouse, and click Create to add the FBA warehouse.
Note: To add an FBA warehouse, you must first authorize the Amazon store in 4Seller. If you do not authorize the Amazon store, you can first authorize the Amazon store in the Shop Manage page.
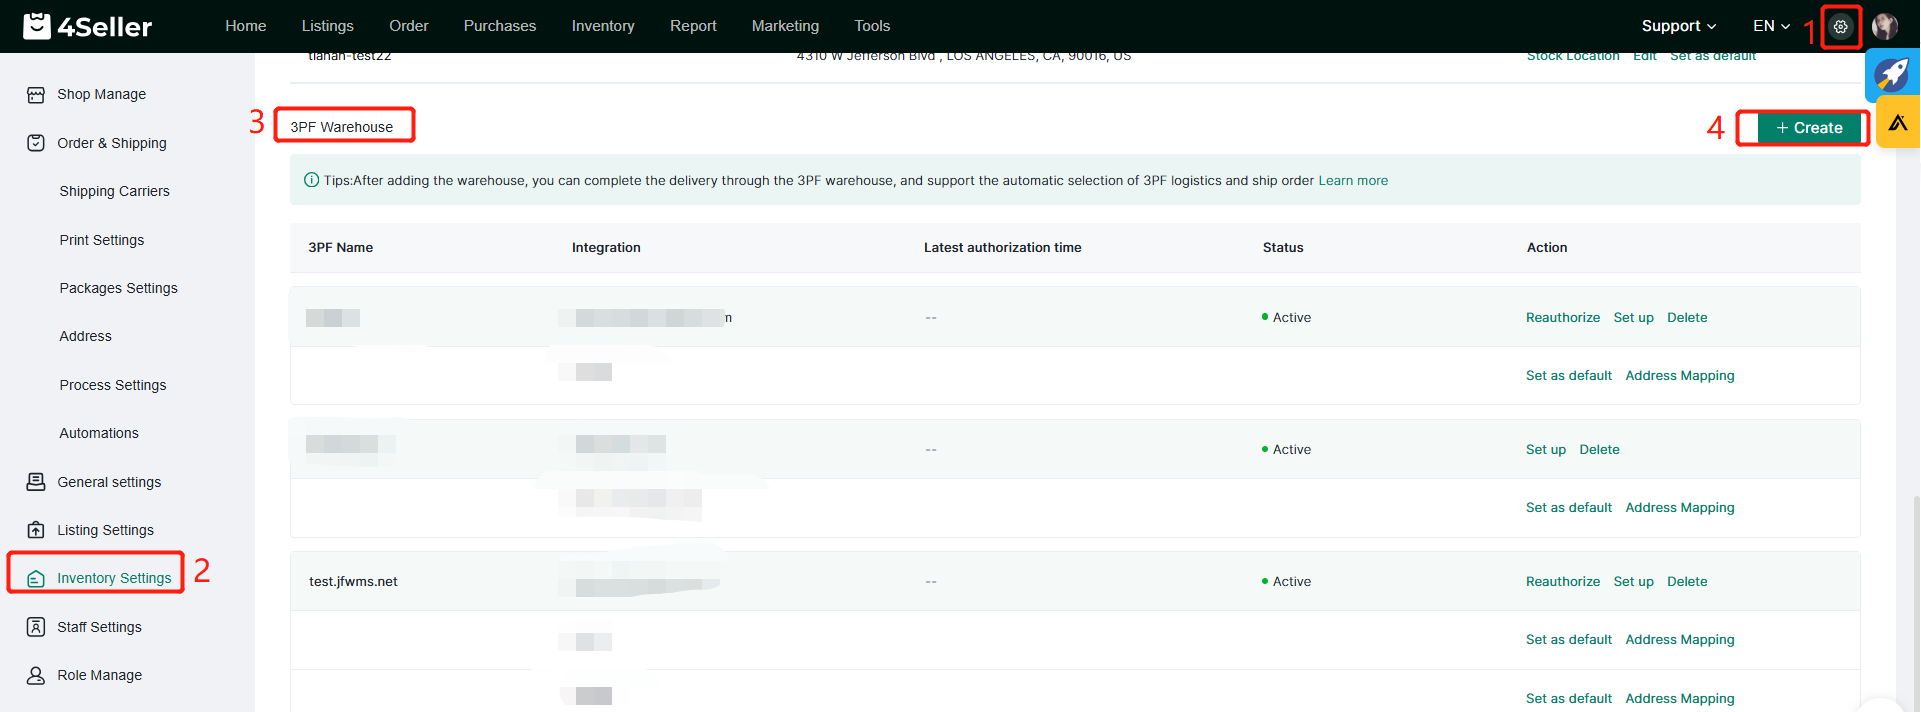
3.2 Synchronizing and Mapping Inventory
Click on Inventory to enter the FBA page, click on Sync Inventory to synchronize Amazon's inventory to 4Seller, and then click on the SKU of the inventory to associate the SKU of the Product.
On the Map Product page, you can search for product by product name or SKU, and click Select to successfully match the inventory SKU.
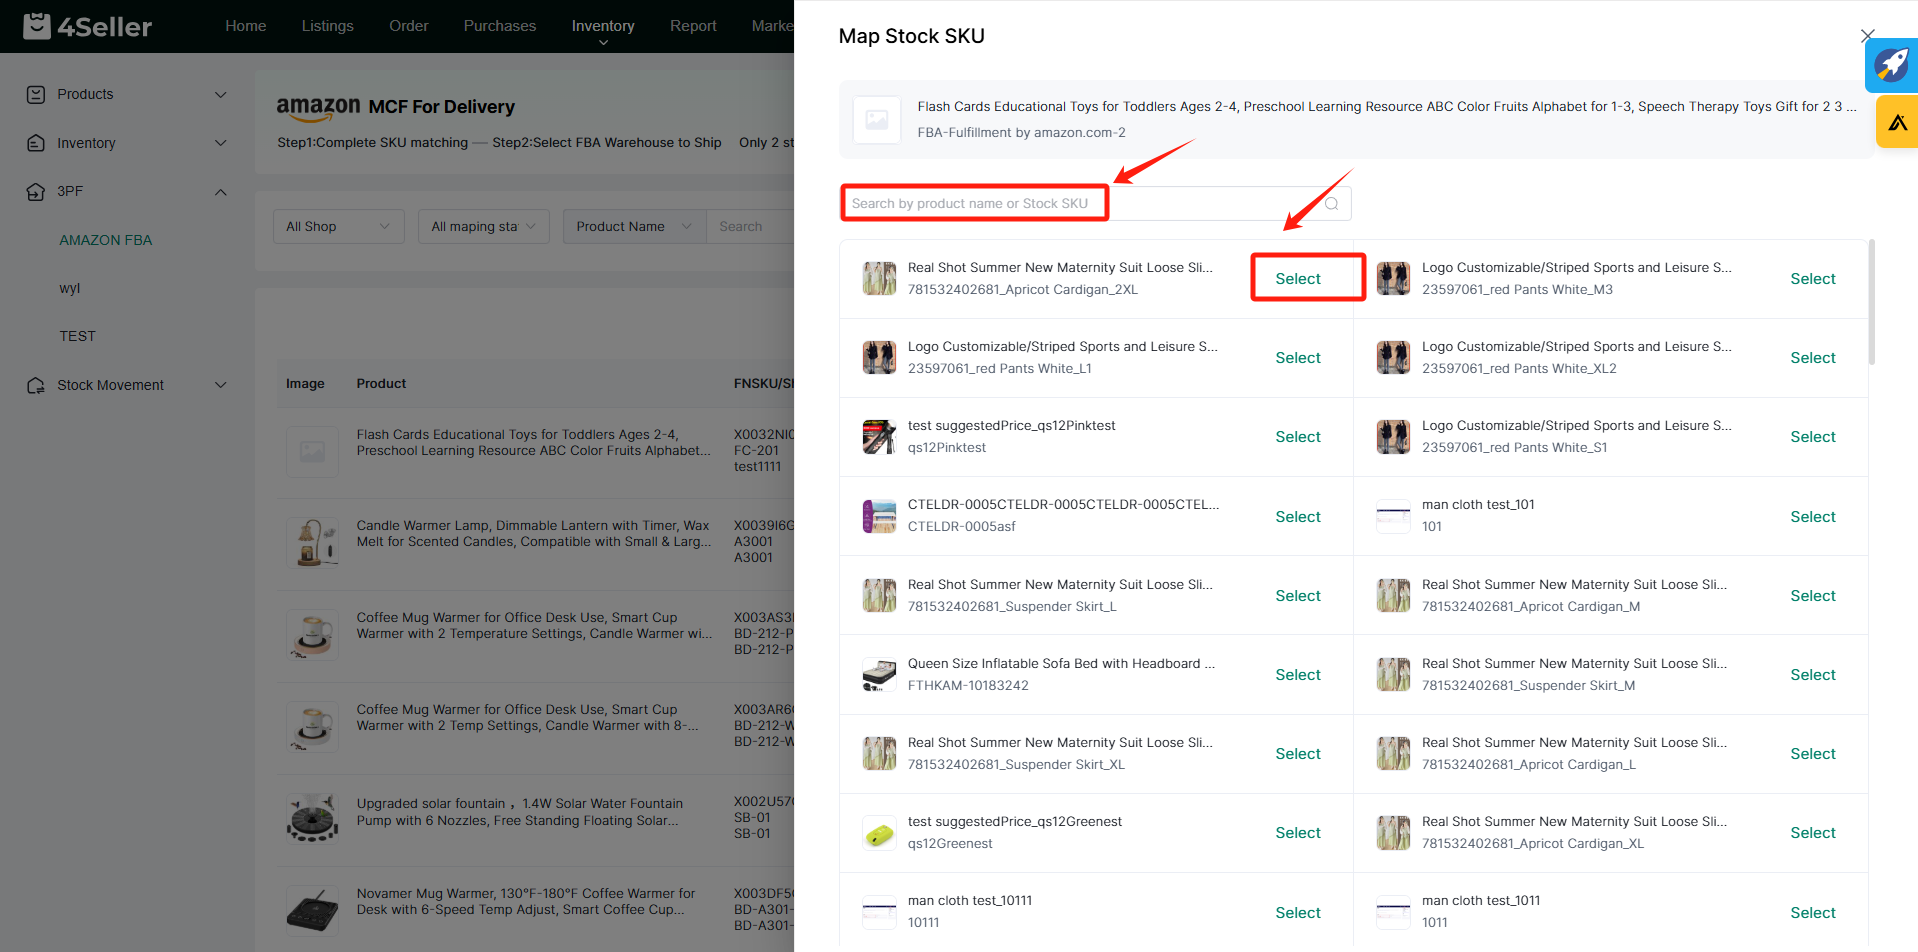
Step 4: Enable Inventory Sync
4.1 Turn On Inventory Sync
Click Inventory Sync under Inventory to enter the Inventory Sync page, click Enable Inventory Sync to set it up.
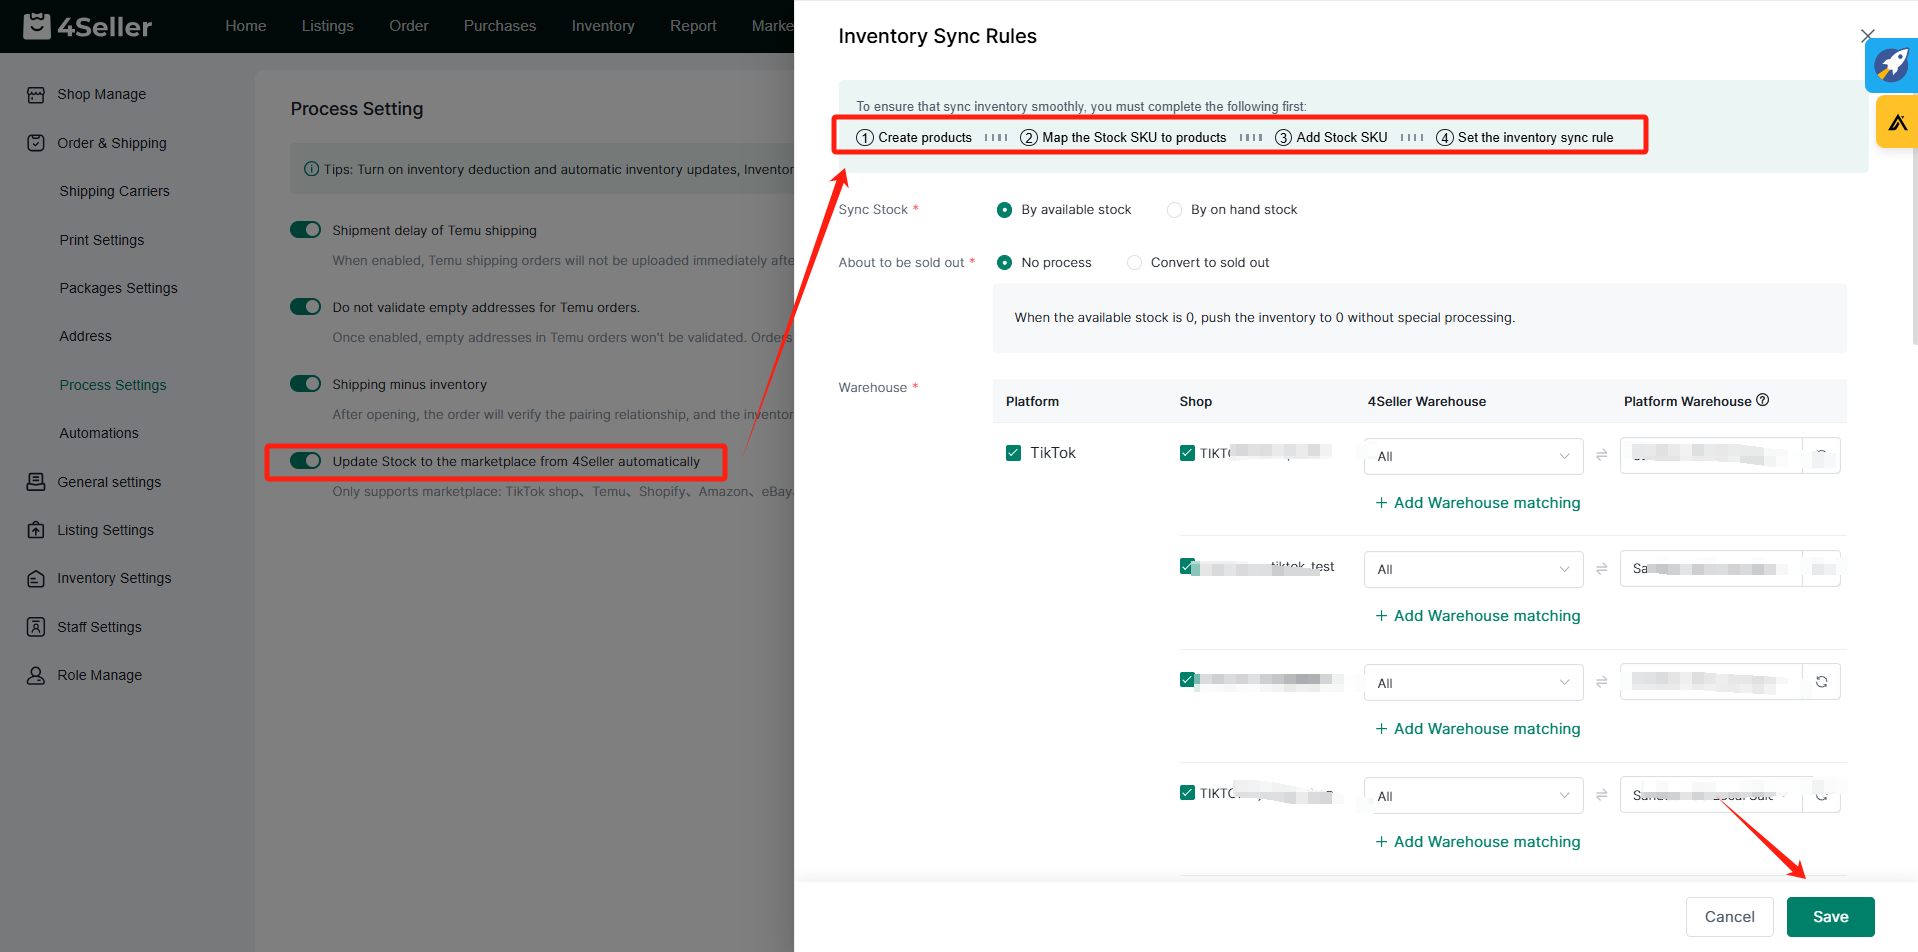
After clicking to Enable inventory sync, you will jump to the Process Settings page. Before setting up inventory sync, you need to enable the Shipping minus inventory option.
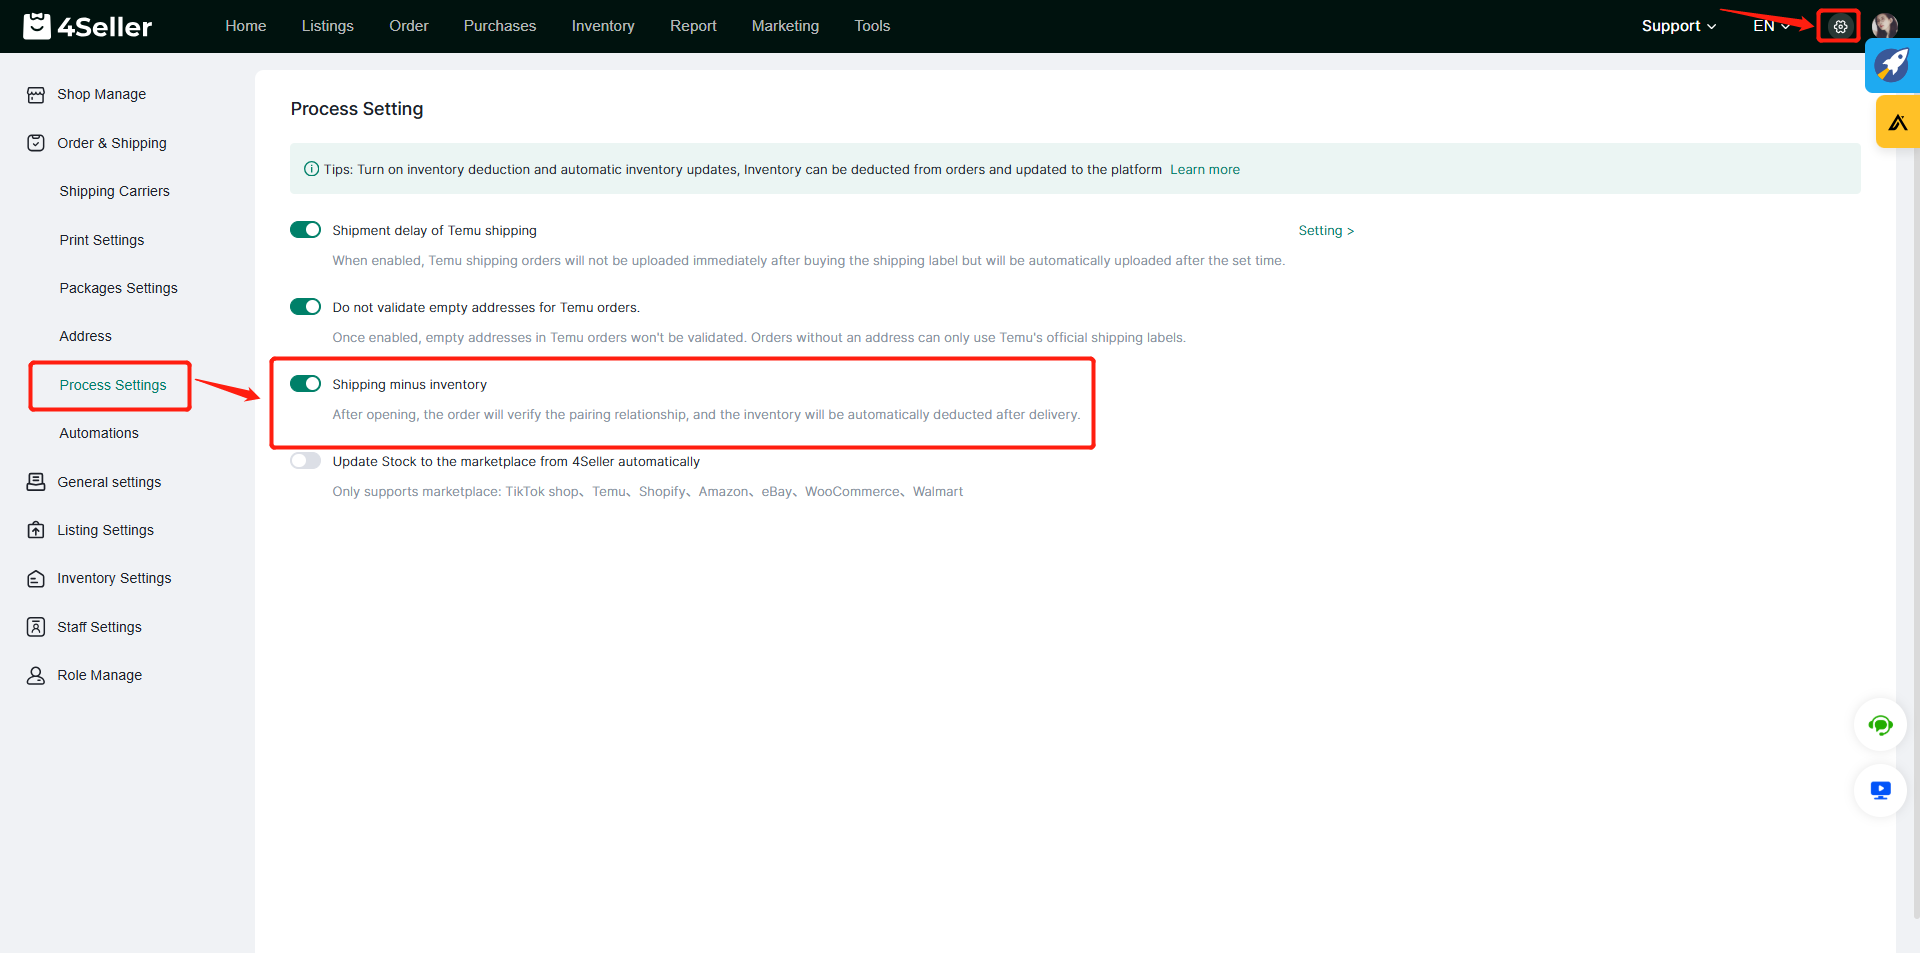
4.2 Set Inventory Sync Rules
Turn on the option of Update Stock to the marketplace from 4Seller automatically, and you can enter the setting page of Inventory Sync Rules. On this page, you can perform the following operations:
1. Select the stock type for synchronizing stock (you can choose to use available stock or on hand stock)
2.Set rule options about to be sold out:
(1) No process: When the stock is 0, push the inventory to 0 without special processing.
(2) Convert to sold out: When stock is lower than a certain value, push stock to 0 for selected shops
3. Add warehouse matching:
(1) Support warehouse matching for TikTok Shop, Shopify, eBay,Shein and Walmart platforms
(2) You can choose stores on each platform
(3) 4Seller warehouse and Platform warehouse can be matched (4Seller warehouse can support all choices)
Note: Because the inventory synchronization maps the system warehouse to the platform warehouse, the inventory synchronization will only change the quantity of the corresponding platform warehouse;
The quantity of listing = The quantity of synchronized warehouse + The quantity of uncorresponding warehouse
Finally, click Save to save the settings of the Inventory Sync Rules.
4.3 View Inventory Sync Records
After setting the inventory sync rules, you can view the sync records of inventory changes on the Inventory Sync page.
Note:
1. Each row represents the latest synchronized record of inventory changes for a SKU.
2. Each main account can push up to 30,000 times per day. If it exceeds 30,000 times, it will no longer be synchronized; it will be refreshed every other day.
Back to top

